Learn how to check the CPU temperature on the Windows 10using a simple app that will help you to monitor your CPU temperature so that you can manage the processing accordingly. So have a look at the complete guide discussed below to proceed.
We probably focus a lot more on caring about the software on the devices so as to keep the functioning all up to the peak levels. But the hardware of the devices does need a lot of care and handling so that the software on your device can run properly and efficiently. Talking about the computer devices the CPU is the most important hardware through which the whole system gets the processing power and the data source. We only mean to tell you that there is certainly a lot more requirements to keep up the CPU working rather than any other hardware modules.
The most common issue that persists in the CPU is that it keeps on accumulating heat and over a long time using the device can heat above the limits, this can cause the hardware to fail. The users must keep the strict check on the temperature of the CPU and in Windows 10 PC it is extremely easy to do so. Although every other operating system is capable of identifying the CPU temperature we will be discussing only the Windows 10. So here in this article, we have written about the whole process through which the Windows 10 users can get the whole information regarding the temperature of the CPU at the instant.
If you are cared about your CPU and don’t wish to let it burnt due to the raised temperature then finding the temperature behavior can help you, and this can be done through the method which you will be learning in this article. Carry on reading the article till the end and then you will definitely grab some efficient knowledge regarding the method!
How To Check the CPU Temperature On the Windows 10
The method is quite simple and easy and you need to use one simple app to check the CPU temperature on Windows 10. And for this, you just need to follow some simple steps to proceed.
Using Open Hardware Monitor (Check the CPU Temperature)
Step 1. You must know before that what is the better temperature range under which the CPU does not exhaust or show any damaging signs. The more prominent temperature for the laptops is 30 degrees to 65-degree Celsius, while above that temperature your laptop will start to get damaged or burnt. By this, we do not mean that your laptop will catch the fire but it will definitely get some damage that can result in hard disk issues, motherboard issues, etc. Generally, for the PC devices, t is all same but certainly, it can withhold the high temperature for more time.
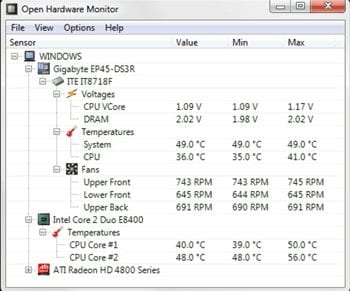
Step 2.Open Hardware Monitor is a great solution for the Windows users as through this software the users will be able to quickly and instantly get the whole information regarding the temperature and various other aspects related to the CPU of Laptop or of Computer. We will be explaining the working and managing of this software so that you can use it for the instance.
Check the CPU temperature on the Windows 10
Step 3. This app shows the core temperature information of your device, the whole load temperature as well as the temperature at which it will be stable. You will get to see the full list of options telling you about the various temperature levels of your PC or laptop computer. To remain attached to the temperature information and get access to it quickly you need to open this app and then pin it to the taskbar. Just right click on the software icon and then select the option Pin to Taskbar. The quick launch option will be added instantly.
Step 4. There are although several apps on the internet that can be used for getting access to the Temperature details of the computer but Open Hardware Monitor is the most reliable and accurate one and it does show the detailed info too. Start by using it or go for any other app for the purpose and keep on checking your device so that it may not burn!
Using Core Temp (open hardware monitor)
Core Temp is a simple and lightweight app that runs in your system tray and monitor’s the temperature of your CPU. The best thing is that it doesn’t consume many resources and it also comes with a few customization options.
Step 1. First of all, download and install Core Temp on your Windows 10 computer and launch it. (Make sure to uncheck bundled tools that comes with the software)
Using Core Temp
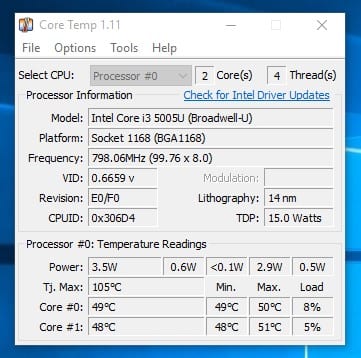
Step 2. Once launched, it will automatically detect your Processor and will show you the Model number and Platform. You can see the Core temperature at the bottom.
best CPU temp monitor
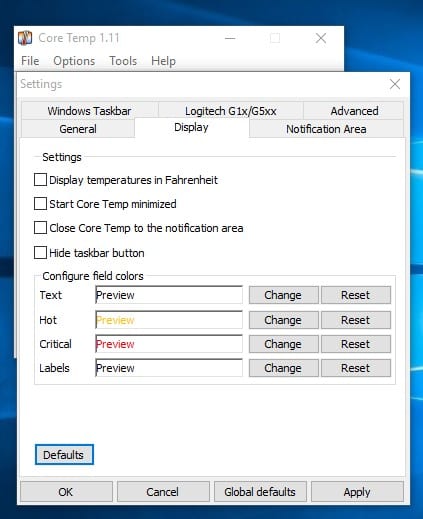
Step 3. Now for customization options, you need to click on “Settings” and then go to the “Display” tab. There you can set the color as per your wish.
Using Core Temp
Step 4. Simply minimize the app and then open the system tray. There you will see the current CPU temperature.
Check the CPU Temperature
That’s it, you are done! This is how you can use Core Temp to show CPU temperature on Windows 10 computers.
Using HWMonitor
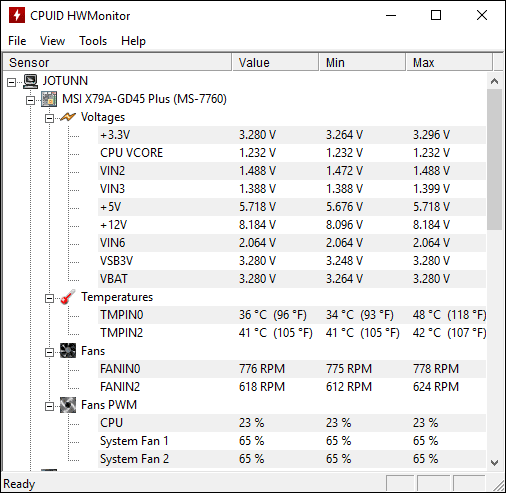
Well, HWMonitor is one of the best and advanced CPU temperature monitoring tools that you can use today. The great thing about HWMonitor is that it shows the temperature of Motherboard, graphics card, CPU, and hard drives. HWMonitor is also one of the most advanced CPY temperature monitoring tools that you can use today. Apart from just showing the temperature of different components, it also shows fan speed and some other important values.
Step 1. First of all, download HWMonitor on your Windows 10 computer. You can get the download link from here.
Using HWMonitor
Step 2. Once downloaded, open the app and install it usually. The tool might ask you to grant the admin access. So, make sure to allow the admin access.
Step 3. Now open the tool, and it will show you the table of temperatures. You will get to see a similar interface.
open hardware monitor
Step 4. To check the CPU Temperature, you need to expand your processor. Now you will get to see the CPU Core temperature.
That’s it, you are done! This is how can use HWMonitor to see temperatures of different components in your system. The app also packs a few other exciting features which you can explore while using the app.
In the latest Windows devices like laptops or desktops, the advanced techniques are pre-built so as to prevent the CPU from grabbing the extra heat, but in the old devices, the cooling fans or the hardware more often get resisted. Therefore it becomes much important to keep the check over the heat or the temperature of the CPU. The method provided above in this article is all focused on providing the users with an easy way to keep temperature check on the Windows 10.
We hope that you will like the information that we have embedded inside this article, and those who really liked this article please tend to support us through sharing it more and more so that lot of people can reach this website. Try to take some more time to provide us with valuable opinions regarding this article so that we can know how you justify our article!


1 Comments
Excellent bro good job keep itup
ReplyDelete